Initial Blender Set Up
Well I said I was going to have a hair tutorial out soon weeks ago. As you can see no hair tutorial. It has been sitting in my post to publish and I just can’t bring myself to publish it. Why? Well this is old school how to do hair. I mean like pre 2007 for Second Life. I think that statement pretty much sums up right there why I can’t publish it yet. I may publish it further down the road just so if anyone that is looking to do the old school hair method, they can. But really, today’s hair is about sculpts. That being said, I am redesigning this section on hair. My goal when I was doing this project was to show current how to times to prove that really, anyone can do it. Really, sorry but the designer in me cringes each time I hover the publish button on that hair tutorial.
I am going to be spending the next few weeks working on introductions to Blender. My hope is that within a months time I can then take the hair pieces I have taught in the Blender workshops and show at the very end how to bring them all together.
Now that being said…go get Blender. It is free and well worth using. http://www.blender.org/
I updated to the current versions of software that is out and downloaded the 2.49b. Make sure when you go to download you hit the installer for your computer version. If you are unsure if you are a 32/64bit, go to the start menu and right click on computer, then hit properties. It will be listed under system type.
You will also need Python. http://www.python.org/download/ – Download the version that blender says to get on Blender’s download page.
After you get that, you will need to get an add on for it so that you can sculpt specifically for second life. It is called Primstar. You can get it here: http://www.dominodesigns.info/project/primstar
After you download primstar, you are going to want to extract it to: /Program Files/Blender Foundation/Blender/.blender/scripts If that folder does not exist you may need to uninstall and reinstall Blender.
It can be a complete pain in the butt, but what you should see when you open up Blender to launch are two Blender tabs. Just go straight for the map looking one window. You should be able to see under Add >Mesh >Sculpt Mesh. (Might also pop up with second life reference in there) If you don’t then something isn’t right.
Sadly when it comes to Primstar installation, I have had several issues. I have decided it is probably based on user error of not paying attention to details of what to get and where. If you have any questions or something isn’t working as you install, please comment here. I will help. I am going to try and write up a more detailed description of what to do this week as well, while updating my version of Blender.
Stay tuned.
Tutorial: Hair Color
While I was working away at first creating the Hair Texture tutorial, I realized that I should probably create a Tutorial regarding the color. There are several different ways to do color, but I figured I would try to give a further explanation so that it didn’t feel like just a stab in the dark to create it. Before I dive in I am going to quickly explain the importance of the color wheel.
The color wheel will have many benefits down the road for creations you may make, but I must stress the importance of it when creating hair. Most hair stylists I have ever worked with, use it in order to come up with the dyes required to make the requested hair color. We can use this very method when working with hair in photoshop, but first let me explain how the Color Wheel works.
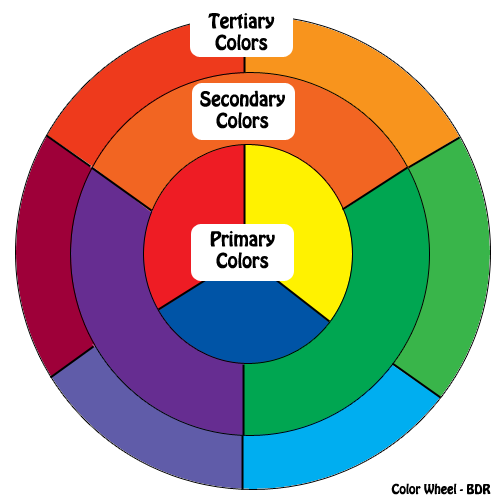
It begins with the primary colors: Red, Yellow and Blue.
Then it goes to the Secondary Colors: Orange (red with yellow), Green (yellow with blue), and Purple (blue with red)
Then we have the Tertiary Colors: Orange/Yellow (yellow with orange), Yellow/Green (yellow with green), Blue/Green (blue with green), Blue/Violet (blue with purple), Red/Violet (red with purple), and Red/Orange (red with orange).
So how does this all apply to hair color? Well hair color basically uses different ratios of the three primary colors. If there is a primary color you want to stay away from (lets say yellow) you would look at the secondary color that is opposite from that to help try to neutralize (which would be purple). This is how you discover which color neutralizes which.
How does this apply to photoshop?
First pick the base color that you want to go with in order to create what it is that you are aiming for. Then decide do you want it red, golden, ash/faded, or just neutralized in that color. Then take the top of a lighter color and then of a dark and apply the streaks. (Note: This is how I recommend trying it just because I like seeing lots of shading of colors in my hair samples. But you can also use double the same color to get a stronger result)
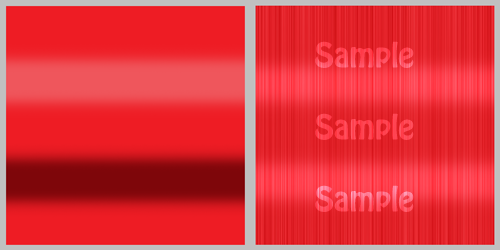
Let’s say I want to make a red hair color. I want a pure red, a slight golden red, and a faded red. For the first one I use a pure red as my base hair color and then a lighter and darker tone of red. This was the result:
For the slight golden red, I used a pure red color for the base and added a pale yellow and then a yellow.
For the faded red, I used a pure red for the base and added a light tone of purple at the top and then a darker tone of purple.
 I am going to quickly note some things before I continue on about this. I suggest going with the tone you are shooting for as your base and manipulating around that with the color you would like to see to help improve it. Green in this case is a neutralizing color. So if you are wanting something red but yet neutralized, it would look like the following: (I apologize to anyone that is red/green color blind. This part in the tutorial may be a little tough to see).
Now there are several different ways of doing a hair color, but if you want to add a way of being able to understand what it is you are doing as you go, then this is what I suggest doing. I also suggest working with the Tertiary Colors and Secondary Colors together in your hair swatch creations. I hope this helps in the understanding of how to create hair in Photoshop.
If you missed the Hair Texture Tutorial, please click here.
Tutorial: Hair Textures
As I was working on my hair design, I stopped and realized something. I have yet to come across a color wheel tutorial for what it means when you are actually going through out the process of making the color texture itself. Thus why I am releasing this first part of the tutorial in two parts. The first part will cover Hair Textures and the link at the bottom will help teach the Color Wheel and relating colors to producing a certain color for a texture.
Personally, I like working with hair textures that are 512×512. But I encourage playing with it to find the sizing that works best for you. I prefer also the bigger sizes because it gives more hair strand definition versus just looking like one big mesh of color. If you think about it, most hair has several various shades to it because of sunlight exposure and so forth.
This tutorial is a Photoshop one. I do not get along well enough with gimp (or rather my computer doesn’t) to create tutorials there.
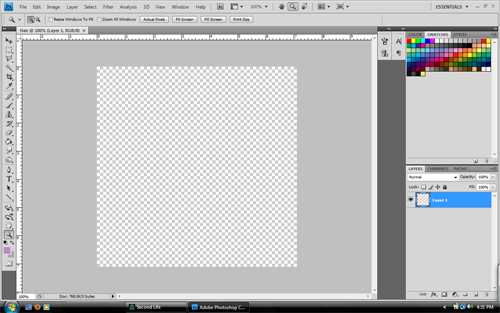
Step 1: create start a new project. And enter the following:
Preset : Custom Width: 512 pixels Height: 512 pixels Resolution: 72 pixels/inch Color Mode: RGB Color 8 bit Background Contents: Transparent.
PLEASE NOTE!!! If you wish the hair to be more glossy you will want to change the RGB settings to Color 16 bit. I suggest when you are playing around with hair styles and finding what works best for you to try have a set of hair colors made in both of these. That way you can find the correct vibe you are aiming for.
You should see something like this once you are done.
Step 2: Grab the black color swatch and fill the canvas. You can do this by either using the paint bucket (if you don’t see that, it is probably because you have selected the gradient one instead. It is a square that has one side darker than the other. If you see this, just right-click on it and switch to the paint bucket) OR you can go up to layer at the top and click on Edit and then on Fill. Make sure you change the contents use to be color (you make have to click on it to get the menu for color options) and it should pop up with a menu to help you find black. You can also type into that new color menu where it has # 000000 (yes those are Zeros).
You should have something like this.
Step 3: Make sure you select your brush tool and then the blurry brush that is part of the Photoshop default brush set. You want the brush size to be 100 pixels.
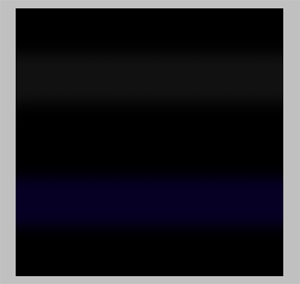
From here select a 95% gray. Hold shift and paint a horizontal line across. Select a dark blue (which you may have to go into the color menu and adjust it to being dark) and do the same thing. Try to make it look like the image below. If you make any mistakes, make sure to hit ctrl + z to undo once and ctrl + alt +z to undo a few times.
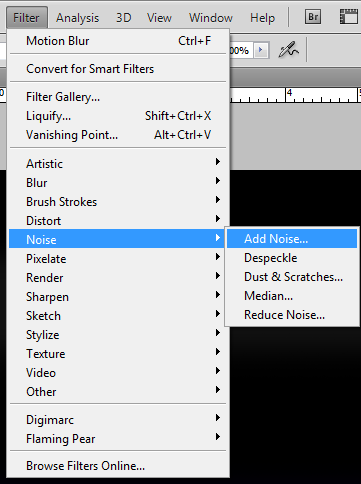
Step 4: It is time for some noise. Go up to Filter and then select noise and then select add noise.
Enter in the following:
 Amount to be 15 % and that the Distribution is Uniform. ALSO VERY IMPORTANT: Make sure you have Monochromatic checked. Hit OK so that it takes effect.
Step 5: Now it is time to make the hair strands! Go into filter, then blur, then motion blur.
Select it and enter the following information:
Distance: 999 Pixels
Hit OK so that transformation takes effect. Congrats!!! You now have made hair strands.
Step 7: Hair always has a shine. I am going to explain how I did it and then at the end explain other methods to use if you decide you don’t like this particular one. Hey, it is the beauty of photoshop!!! Always more than one way to do something.
From here create a new layer. (ctrl + shift + n). Then reselect the 100 pixel blurry brush along with a White color. Hold shift and paint two lines across so that it looks semi like what it does in the image below:
Now here is the fun part. You can either Overlay this to look like below:
OR! You can soft light it to look like the image below.
If the white looks too much to you, then go up to Filter, Blur, Gaussian Blur and play with that a little bit til you get it how you desire.
Congrats!!! You have now made a hair swatch. Save the psd file as SLhairswatch. And then click file > Save for Web & Devices. I suggest saving it as a png. Name it BlackHair1.0 swatch. (I am odd and always add numbers at the end that way I know when i go back in and do a revise to that particular color).
Okay. So as promised I was going to discuss the other methods at this point you can do for the highlighting. You can use your dodge tool and play with the range and exposure settings. Then proceed to hold shift and draw in a horizontal line over the actual texture layer.
Or when you are painting with the white brush set it so the brush opacity itself (it will be apart of the menu up at the top where you change your brushes at) to a different setting.
One of my favorite other methods is to use smaller horizontal brush lines of black on a new layer (or use the burn tool on the existing layer) in order to help give more shading and shine effect to the hair. Thing is you can really do a lot at this point. I suggest playing around and finding what you like the most that fits to your liking. After all that is part of the artistic process: just playing around with it and having fun.
Tutorial: Pose Stand
This tutorial was made in order to help those in the beginning stages of designing. I am starting off with a tutorial on a Pose Stand. Silly, perhaps to some. Don’t be to quick though to rule out the coolness of the pose stand. It is probably one of the most important items that can be taken for granted in Second Life.
I am going to do just a basic concept one, but I would like to point out that a pose stand should be something to kind of have fun with. I mean you are the artistic genius, so why not make something to help inspire you in the process. Perhaps a stool to stand on or maybe some scales that take your weight? Or even maybe a small Lego?
Now in case for those that are still sticking their noses up to the concept of a pose stand, let me explain my reasons. It makes it easier when editing prims around an idea, let alone a shape. It comes in major use for prim attachments for clothing, jewelry, accessories, odds and ends, and even hair. The MAIN benefit to being your own designer, is creating your own things. Meaning, you can make them to specifically fit YOU (or even a model later on).
Since I know there are several users of Second Life that have a prim limit and can’t always rez up several prims, I decided to do only a one prim pose stand. I like silly things and highly recommend playing in photoshop or gimp to find what works for you.
I am going to make a simple cylinder pose stand. So I rez a prim and enter the following:
Size:
X: 1.000
Y:1.000
Z:0.050
Taper (optional): [This gives a nice easy frame look if you want it]
X: 0.10
Y: 0.10
And there you have a pose stand. You can easily use this for the box option too if you do not think that the cylinder is doing it for you.
The next part that you need is the pose script. Create a new script by clicking the object you created and editing it. Click the Content tab and then the new script button below that. Right click on the script to change the script name to something like Pose Stand Script. Then double-click that to open it.
Select and delete everything that is there. Copy and Paste in the following. (Note: This script was not composed from me. I did some research online for one that works. This came from http://wiki.secondlife.com/wiki/Posing_stand )
//Bella all the way xD
//

key mkLoungingAgentKey = NULL_KEY;
integer miPermissionsAcquired = FALSE;

 default
 {
     state_entry()
     {
         //overriden sit target
         //lower them a bit
         vector vLoungeTarget = <0.00, 0.00, 1.00>;

         rotation rX;
         rotation rY;
         rotation rZ;
         rotation r;

         //build rotations
         //Note: this is broken out like this to simplify the
         //        process of finding the correct sit angle.  I
         //        use the following form until I have the rotation
         //        that I want perfect, and then I simply
         //        hardcode the perfected quaterion and remove
         //        this mess.
         //
         rX = llAxisAngle2Rot( <1,0,0>, 0 * DEG_TO_RAD);         //cartwheel
         rY = llAxisAngle2Rot( <0,1,0>, 0 * DEG_TO_RAD);       //sumersault
         rZ = llAxisAngle2Rot( <0,0,1>, 0 * DEG_TO_RAD);       //turn in place

         //combine rotations
         r = rX * rY * rZ;

         //override 'sit' on pie menu
         llSetSitText( "Stand" );

         //override default sit target and rotation on prim
         llSitTarget( vLoungeTarget, r );
     }

     changed(integer change)
     {
         if (change & CHANGED_LINK)
         {
            key agent = llAvatarOnSitTarget();
            if ( mkLoungingAgentKey == NULL_KEY && agent != NULL_KEY )
            {

                //changed user
                //cache new user key and request their permissions
                mkLoungingAgentKey = agent;
                 llRequestPermissions(mkLoungingAgentKey,PERMISSION_TRIGGER_ANIMATION);
            }
            else if ( mkLoungingAgentKey != NULL_KEY && agent == NULL_KEY)
            {

                //user is getting up
                if ( miPermissionsAcquired )
                {

                    //restore anims
                    llStopAnimation("turn_180");

                }

                //reset the script to release permissions
                llResetScript();
            }
        }
    }

    run_time_permissions(integer parm)
    {
        if(parm == PERMISSION_TRIGGER_ANIMATION)
        {

            //set permission flag
            miPermissionsAcquired = TRUE;

            //cancel the sit anim
            llStopAnimation("sit");

            llStartAnimation("turn_180");
        }
    }
}
Then click save. And you are no done with the pose stand animation that is required.
From here click on the texture tab, then click on the texture in your inventory you wish to use. If it is not there, create one in Photoshop or in Gimp. If you are not wanting to turn there, try the many various texture shops in world. I already made some textures and uploaded them to give my pose stand a wacky fun look. Have fun and happy creating.
And It Starts…
I will not reveal who I am. If asked, I shall reply with “Brandy Darkrose”.
What am I about? I am a project. At the end, only those that know me will figure out who I am.
I am giving myself a year to try and make myself in Second Life look like my real life self. I do not know how to do several of the things in Second Life so I will be teaching myself a lot of new things on the way.
I have given myself a year to accomplish this goal. Real Life is important and does come first for me.
Details about the project:
I will be having a premium account. This is so I can have space to conduct this project in secret. Also, the 300L/week will become my budget for this project. Not one item on the finished product will be anything but my own.
The goals of this project:
To show that anyone can create in Second Life.
To learn new things in our virtual world but also new things about myself.
At the end, I am just an artistic creation of how I see myself.
First Assignment:
Hair. I will have to learn how to create hair.
