Tutorial: Hair Textures
As I was working on my hair design, I stopped and realized something. I have yet to come across a color wheel tutorial for what it means when you are actually going through out the process of making the color texture itself. Thus why I am releasing this first part of the tutorial in two parts. The first part will cover Hair Textures and the link at the bottom will help teach the Color Wheel and relating colors to producing a certain color for a texture.
Personally, I like working with hair textures that are 512×512. But I encourage playing with it to find the sizing that works best for you. I prefer also the bigger sizes because it gives more hair strand definition versus just looking like one big mesh of color. If you think about it, most hair has several various shades to it because of sunlight exposure and so forth.
This tutorial is a Photoshop one. I do not get along well enough with gimp (or rather my computer doesn’t) to create tutorials there.
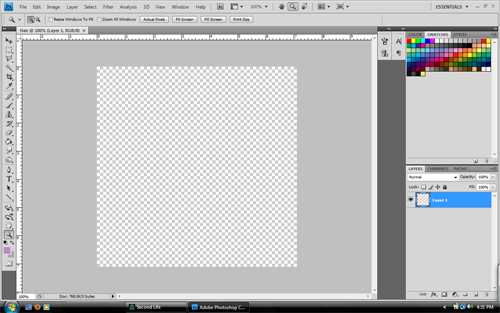
Step 1: create start a new project. And enter the following:
Preset : Custom Width: 512 pixels Height: 512 pixels Resolution: 72 pixels/inch Color Mode: RGB Color 8 bit Background Contents: Transparent.
PLEASE NOTE!!! If you wish the hair to be more glossy you will want to change the RGB settings to Color 16 bit. I suggest when you are playing around with hair styles and finding what works best for you to try have a set of hair colors made in both of these. That way you can find the correct vibe you are aiming for.
You should see something like this once you are done.
Step 2: Grab the black color swatch and fill the canvas. You can do this by either using the paint bucket (if you don’t see that, it is probably because you have selected the gradient one instead. It is a square that has one side darker than the other. If you see this, just right-click on it and switch to the paint bucket) OR you can go up to layer at the top and click on Edit and then on Fill. Make sure you change the contents use to be color (you make have to click on it to get the menu for color options) and it should pop up with a menu to help you find black. You can also type into that new color menu where it has # 000000 (yes those are Zeros).
You should have something like this.
Step 3: Make sure you select your brush tool and then the blurry brush that is part of the Photoshop default brush set. You want the brush size to be 100 pixels.
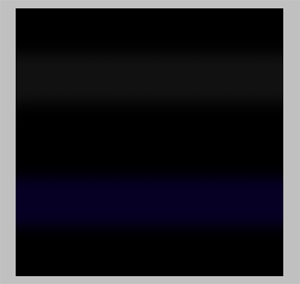
From here select a 95% gray. Hold shift and paint a horizontal line across. Select a dark blue (which you may have to go into the color menu and adjust it to being dark) and do the same thing. Try to make it look like the image below. If you make any mistakes, make sure to hit ctrl + z to undo once and ctrl + alt +z to undo a few times.
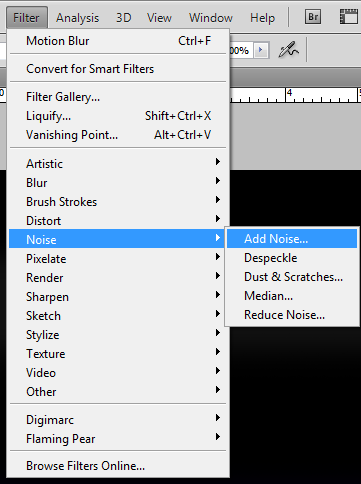
Step 4: It is time for some noise. Go up to Filter and then select noise and then select add noise.
Enter in the following:
 Amount to be 15 % and that the Distribution is Uniform. ALSO VERY IMPORTANT: Make sure you have Monochromatic checked. Hit OK so that it takes effect.
Step 5: Now it is time to make the hair strands! Go into filter, then blur, then motion blur.
Select it and enter the following information:
Distance: 999 Pixels
Hit OK so that transformation takes effect. Congrats!!! You now have made hair strands.
Step 7: Hair always has a shine. I am going to explain how I did it and then at the end explain other methods to use if you decide you don’t like this particular one. Hey, it is the beauty of photoshop!!! Always more than one way to do something.
From here create a new layer. (ctrl + shift + n). Then reselect the 100 pixel blurry brush along with a White color. Hold shift and paint two lines across so that it looks semi like what it does in the image below:
Now here is the fun part. You can either Overlay this to look like below:
OR! You can soft light it to look like the image below.
If the white looks too much to you, then go up to Filter, Blur, Gaussian Blur and play with that a little bit til you get it how you desire.
Congrats!!! You have now made a hair swatch. Save the psd file as SLhairswatch. And then click file > Save for Web & Devices. I suggest saving it as a png. Name it BlackHair1.0 swatch. (I am odd and always add numbers at the end that way I know when i go back in and do a revise to that particular color).
Okay. So as promised I was going to discuss the other methods at this point you can do for the highlighting. You can use your dodge tool and play with the range and exposure settings. Then proceed to hold shift and draw in a horizontal line over the actual texture layer.
Or when you are painting with the white brush set it so the brush opacity itself (it will be apart of the menu up at the top where you change your brushes at) to a different setting.
One of my favorite other methods is to use smaller horizontal brush lines of black on a new layer (or use the burn tool on the existing layer) in order to help give more shading and shine effect to the hair. Thing is you can really do a lot at this point. I suggest playing around and finding what you like the most that fits to your liking. After all that is part of the artistic process: just playing around with it and having fun.


Leave a comment